Knowledge Centre- Subject Index Main Help page |
Gallipoli:- Exploring the Şevki Paşa post-evacuation maps
Abstract. The 1:5,000 Şevki Paşa maps offer the best means to locate trenches and other features of the Gallipoli campaign because most other large scale maps of the time are better described as diagrams and offer poor accuracy. These maps were drawn immediately after the evacuation based on previous 1:25,000 maps, the aim was to record the detail before the effects of erosion on the battlefield features took effect. For a long time they were overlooked, owing partly to the lack of a reliable legend but since the publication of the whole set in 2009, they are now more readily available for evaluation. The maps are very detailed and appear to be accurately drawn, however, some features are missing and some aspects of accuracy leave space for further investigation. The whole set and legend are available on TrenchMapper and are tagged Post-Evacuation.
The Şevki Paşa maps are more officially known as the Çanakkale tâhkimât haritasi, the Çanakkale Fortification Maps, a set of 43 very detailed maps drawn on a scale of 1:5,000 immediately after the evacuation of the Gallipoli peninsula. The British and Anzac forces evacuated the Gallipoli peninsula after their disastrous campaign; those in the north in the Suvla Bay and Anzac areas left before dawn on 20th December 1915 and the last troops in the south left Cape Helles in the early hours of 8th January 1916.
Very quickly afterwards the Turks started a survey of the whole battlefield to record what was left before time and the elements covered over the remains, a project commanded by Brigadier General Mehmet Şevki Paşa, a man noted for his skills in cartography and geodesy. Preparation of the 43 base maps was substantially complete by February 1916 and the addition of an amazing amount of battlefield detail was completed by the end of September 1916.
Before this in time for use during the campaign, the Turkish had produced a set of 36 maps at 1:25,000 prepared by detachments of the First and Second Army and published on 5th May 1915. It is likely these were used to produce what were to become known as the Şevki Paşa maps, the Çanakkale tâhkimât haritasi. As with pre-war Ottoman maps, they were drawn using the Bonne projection with the Prime Meridian through the Dome of the Hagia Sophia in Istanbul. This reflects the French origins in cartographic Turkish training although nearer to the war the influence was more from German practice.
|
|
Şevki Paşa the cartographer. Mehmet Sevki Ölçer known widely as Şevki Paşa or Pasha, was born in 1866 in Istanbul. He graduated from the Eyup Military Middle School then from Kuleli Military High School. After staff training in the War Academy he was appointed Staff Captain on 27th June 1886 followed later by appointment as professor in the Military Artillery and Engineering School. After a period in the French War Academy in Paris, he was subsequently assigned to the French Military Geography Administration, returning to Turkey in 1894 and the rank of Major. In Eskisehir in 1896 he worked on triangulation for topographic maps and was promoted to lieutenant-colonel in 1901. The French influence gave rise to a preference for the Bonne projection and set the scene for future mapmaking of Turkey. Following promotion to colonel in 1908, he was appointed Geodesy Director of the new Mapping Commission under the leadership of Mehmet Zeki Bey. |

Much work of this period involved maps of the Ottoman Empire, starting at Bakrkoy. He organised and directed field surveys at Istanbul, Adapazar, Eskisehir and Edirne in 1910-11. He was promoted to brigadier-general in 1912 and then just 3 years later became president of the Military Mapping Commission; as a result he is credited for publishing all the Turkish maps for the Great War intended for the army. He also wrote seven books on Turkish cartography but is principally remembered for his most famous work, the Çanakkale Fortification Maps.
The maps. Most of the maps show the layout of the land and features in great clarity. It is obvious that a lot of care and effort went into detailed survey and the resulting over-print with post war military detail. Their use in modern times was hampered by the lack of a legend; various organisations have a complete set of 43 maps but no legend. A copy of the legend was tracked down to Australia but no copies were easily available. In 2009 a complete set of the maps including the legend was published by Şevki Paşa M, (2009). It is likely the difficulty in obtaining the legend contributed to a decline in interest in the maps even in Turkey, some say they had been ‘forgotten’, but since 2009 a better understanding of the maps is possible and very desirable. The legend (or Conventional signs) for the 1:25,000 series maps is similar and readily obtainable, however, that does not include the military symbols. The TrenchMapper project (2022) has the complete set of 43 1:5,000 maps and 62 of the 1:25,000 1912-1913 sheets georeferenced on-line and their re-drawn legends.
Trenches and other line features. Detailed examination shows slight differences in map symbology between sheets suggesting different survey teams were assigned to different map sheets. It maybe that some teams were overloaded resulting in a few areas being left unmapped.
Ottoman military line features are shown in red, allied in dark blue. The 1:25,000 maps used a dashed line for a footpath, a single solid line for a common track and a solid line adjacent to a dashed line for an earth cart road less than 2 metres wide. The 1:5,000 maps seem to use these symbols but the single solid line symbol is also used for what appear to be trenches. That means it is sometimes not clear if a line is a trench or a track. In addition, a double solid line is used for trenches other than those ‘organised for fire’. Trenches organised for fire or fire trenches are shown using the same symbol as the 1:25,000 symbol for a ditch with bank and hedge, i.e. a double solid line with small triangles on one side. On some sheets a wide single solid line is used instead with triangles. These fire trenches have the triangles (what was the hedge symbol) on the enemy side and some have small regular bays on the opposite side. Fire trenches are also shown with complex diggings in various patterns implying they show the actual rather than symbolic layout of what was found in 1916.
The legend printed in the 2009 set of the maps (Şevki Paşa M) shows separate lists of symbols for the Ottoman and enemy fortifications. Although similar there are some differences as there are between map sheets. For example, sometimes a dense row of Xs is used to depict wire defences, XXXXXXXXX but in other sheets a X-X-X-X-X-X-X symbol is used and on others X---X---X---X---X. The pre-war symbol for a wire fence looks similar and appears on some places on the Şevki Paşa maps, especially around cemetery perimeters. Narrow gauge railways, much used by the attacking forces, are shown using the German standard symbol- a single line with very short cross lines, a similar symbol but with the cross lines further apart shows telegraph lines, however, context enables the clear differentiation of these features.
A line with regular arrows shows an underground water supply conduit with the arrows showing flow direction, an important detail as water supply was a key factor for both sides in the war. They generally lead to cisterns, many of which are depicted.
The large number of intermittent streams are shown by very dark blue dashed lines. Many of these were used as tracks and frequently a track symbol leads into a stream.
The large scale permits the depiction of fighting tunnels, allied in yellow and Turkish in green. To map a recent battlefield in such detail is a credit to the mapmakers, such tunnels are very dangerous places to survey owing to the possibility of collapse and because they may have contained undetonated mines.
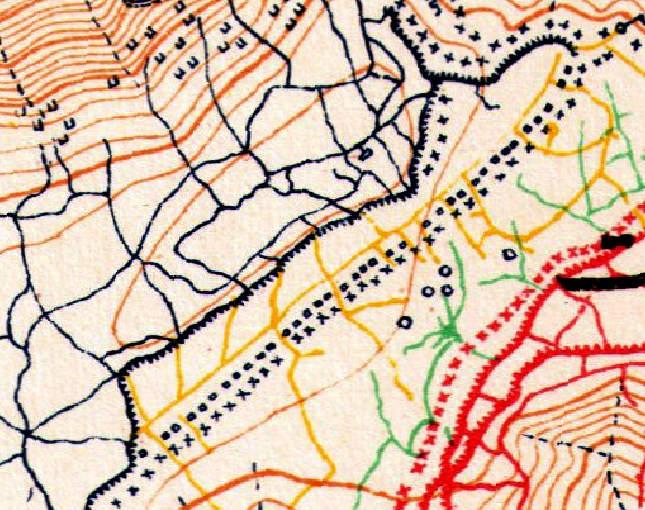 |
Figure 1. Map fragment 280 metres wide a few hundred metres north of Lone Pine showing fire and support trenches, wire, tunnels and contours. The dark circles may show detonated mine craters, but that is not clear on the legend. Elsewhere support trenches dug in the usual zig-zag pattern are drawn zig-zagged and not with a symbol, implying the trenches shown here were simple linear features. The symbols used as a second parallel line to the allied (blue) wire is not known although the legend implies the small circles are foxholes or defensive pits of some kind. The U shaped symbol top left is also unknown but appears many times on the map. They may also indicate foxholes. |
|
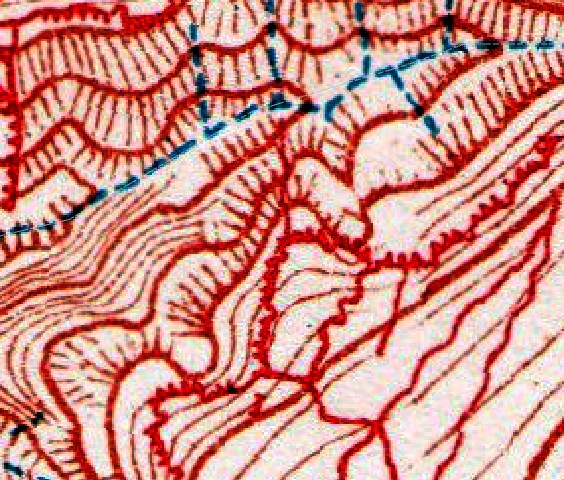 |
Contours. Most reports state that contours were drawn every 10 metres but when the maps are georeferenced to modern maps and a DEM added, measurements show the main lines are 10 metres apart but there are 5 minor divisions in between meaning the contour interval is 2 metres. This gives rise to some difficulty in the heavily ridged areas, a difficulty later compounded by the use of red Turkish trench lines shown alongside the red/orange colour of the contour lines. Sometimes it is difficult to differentiate trench from contours. To make that worse, these ridged areas are also shown hachured. Figure 2. Fragment showing contours, hachures, trenches organised for fire, support trenches and intermittent streams |
Cemeteries. The 1:25,000 legend shows Islamic cemeteries as a mixture of grave markers and trees, both coniferous and deciduous. Those on the 1:5,000 maps show variations on this theme, some with just the grave markers, some with trees added. Allied cemeteries are shown by an array of symmetrical crosses with or without wire boundaries. Some of the Turkish cemeteries are pre-war and may be quite ancient but not all expected sites are marked, for example the one at Büyük Anafarta is not shown but some 3.5km north, the 11 hectare ancient cemetery at Küçükanafarta is clearly shown. There are numerous small allied battlefield cemeteries shown but very few Ottoman examples. Much post war work was completed creating allied concentration cemeteries where the exhumed bodies were moved to larger centres. Various agencies mapped these cemeteries and individual burials, some of which are marked on maps available in the TrenchMapper project, e.g. TrenchMapper map id md_023884, however, none of the individual burials appear on the Şevki Paşa maps. Further investigation is required regarding the Ottoman battlefield cemeteries.
Of the 77 cemeteries of all sizes shown on the Şevki Paşa maps, 33 are tagged Islamic and 44 enemy although the Islamic ones include those that pre-date the war.
| Smallest m2 | Largest m2 | Total area m2 | Number of sites | |
| Islamic | 237 | 11,100 | 31,100 | 33 |
| Allied | 183 | 11,000 | 120,000 | 44 |
Table 1. Measures of cemetery sizes
One area of 23,500m2 about 1km SE of the current CWGC cemetery at Lala Baba is shown on sheet 13 of the Şevki Paşa maps as a rectangle with a single cross. It is not clear what this represents. The Lala Baba cemetery was formed after the Armistice by the concentration of 9 small cemeteries, it now contains 216 graves in an area of 1,136m2, so the 23,500m2 area is not likely to be have been a cemetery in 1916.
Artillery. A simple German style three line symbol is used for field artillery, some with earthworks or other defences. Although not entirely consistent, they appear to show the general direction of fire. Another German style symbol is used for howitzers, a circle with a line through and a double circle for heavier weapons. The 43 maps show 840 gun positions, a symbol being used for each gun rather than for each battery but no distinction is made between allied or Ottoman guns, however, the relatively static nature of the actions make it clear which is which. Approximatly 220 of these are on the allied side of the trench lines and many of the Ottoman guns are coastal. One of the principal aims of the Gallipoli campaign was to neutralise the coastal artillery batteries (Chasseaud P, Doyle, P.) and hence open the Dardanelles to allied shipping, at first by use of the navy and when that had failed, by land assault. Both attacks had difficulty targeting these batteries, partly because some were mobile. Some of the coastal guns marked on the Şevki Paşa maps correlate with British Naval intelligence maps e.g. TrenchMapper map id m_78_000263.
Map accuracy. Many reports suggest these maps are accurately drawn, mainly using plane table surveys. However, georeferencing them to modern maps was a challenge as there is no graticule or any other indication of geometry. The map margins, although seemingly aligned north/south, do not line up with known meridians.
The maps were drawn to the Bonne projection referred to the meridian through the dome of the Hagia Sophia (28° 58' 48.94' east of Greenwich) with a latitude of origin set to 44 grades, 39° 36' north. Some reports suggest the Clarke ellipsoid was used but do not state which specific ellipsoid so it was assumed to be Clarke 1886, i.e. values agreed not long before the 1:25,000 series maps were drawn upon which the 1:5,000 maps were based.
When these parameters are set, the graticule does not line up with sheet edges in an expected manner, i.e. it is common to have sheet edges at regular round numbers of degrees, or metres using suitable false eastings and northings. Attempting this, it is possible to achieve an approximate fit but not consistently along the extent of the peninsular. If the grid lines are set to fit the sheets in the south, errors of 50 meters or more become apparent further north. This method to georeference or rectify the maps was abandoned.
Using the conventional method of using GCPs, Ground Control Points, setting each map sheet was generally impossible as comparison with modern features yielded far too few matched points to work for each map sheet. The area was largely rural with little or no fixed infrastructure. A second approach was to join the sheets graphically into one full map and georeference that on a best fit basis to the whole peninsula. To achieve this, each sheet was graphically resized to fit the expected 3.5 x 2.5 km ratio (or pro-rata for smaller sheets) and any departure from a strict rectangular format corrected to ensure any distortion in the paper that had occurred in the 90 years before scanning was eliminated. This highlighted some difficulties; coastal erosion and deposition during the last century has changed the outline of the peninsular, roads, tracks and even river creeks show different forms making suitable points difficult to find. However, being quite rocky, the northern headland of Suvla Bay provided a suitable point as did the eastern tower of the old fort in Helles, the Sedd el Bahr Fortress. Six other points were selected and various transformation methods tested to achieve a good fit to a modern map. None were entirely successful. The map 'fits where it touches' so when some features are accurately located others are displaced.
The difficulty in georeferencing the whole assembled map means the absolute accuracy of a point for use in GPS will fall below what was hoped for. In contrast, measurements show that relative distances and bearings point to point on one sheet seem to be reasonably accurate (Sagona A, Atabay et.al.), use of GPS in battlefield archaeology yielded useful results when plotting entry points of trench tunnels and trench lines. The authors provided a good number of examples of where surveyed trench lines match well with the Şevki Paşa maps but did not state how the maps were georeferenced, i.e. how local fixed points were related to the WGS84 coordinates. This implies that the use of mainly plane table surveys yielded locally useful accuracy but the possible lack of an accurate primary triangulation made fitting the individual sheets into a more coherent whole rather difficult.
It was hoped that the accuracy could be cross checked with allied maps made for use during the battles, especially those marked 'Compiled from Photographs & Traverses'. One drawn to a scale of 1 inch to 150 feet was typical of the results, it being especially difficult to rectify. Considerable experiments were made fitting these and other trench diagrams and maps to the Şevki Paşa maps, none were fully successful. Even allowing for the lack of a means to overcome the foreshortening effect of aerial photographs in hilly country, i.e. no orthorectification, the patterns of marked trenches differed considerably.
The Şevki Paşa maps show what was there after the fighting so there should be more trenches shown on those than on a map drawn some months earlier; this is often not the case, some trenches depicted on the diagrams do not show on the Şevki Paşa maps and those that correlate by general layout and shape match only very approximately. For this reason, it is assumed that the Şevki Paşa maps are locally quite accurate, (Sagona A, Atabay et.al.) and that what would seem to be accurately surveyed allied plans or diagrams made during the height of the fighting are not as accurate as they appear.
Missing features. During the search for GCPs, it was seen that in some areas whole trench systems were missing. For example, in Figure 3, an aerial photograph of the area north of Anzac bay taken 76 days before the evacuation shows trenches and an organised area, possibly an encampment. The map shows different detail and orientation for the organised area and no trenches; it does retain the track symbol from the source 1:25,000 mapping. Abandoned campiagn vessels are depicted so at least some battlefield debris was recorded. The black arrow is on the original photograph, not added here.
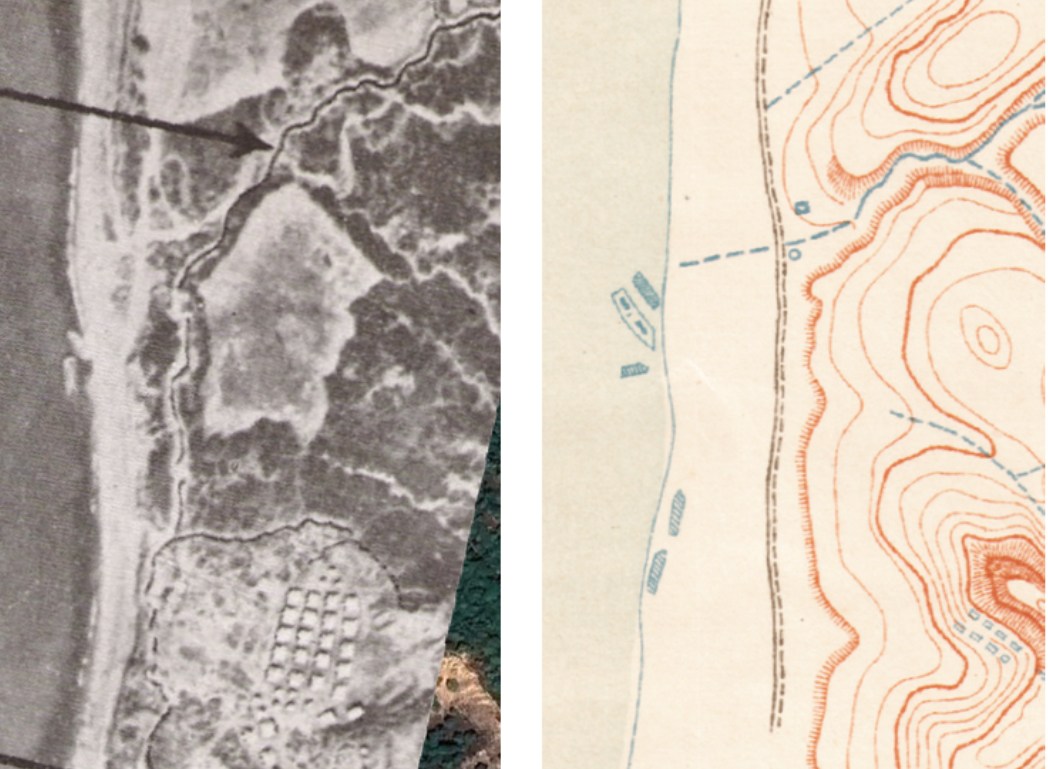
Figure 3. Fragment of an aerial photograph taken 5th October 1915 and the same area shown on the Şevki Paşa map.
A second example is taken from a British 1:10,000 map of the Scimitar Hill area, it shows clear tracks, some of which are missing from the Şevki Paşa map. The British map is based on information available up to 10th October 1915, 71 days before the evacuation. There are obvious differences in the pattern of trenches, some of which will have been dug after the British map was drawn and the wire is not shown, but the reason the track running approximately NW/SE is missing from the Şevki Paşa map is not clear. It was shown on the 1:25,000 map from 1912-1913.
The same pattern of missing features is evident across all the 43 sheets.
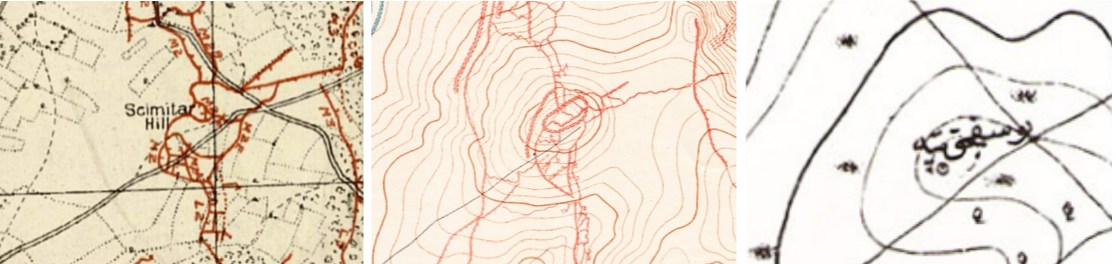
Figure 4. British 1:10,000, Şevki Paşa, Turkish 1:25,000 from 1912-1913
Further investigation. A number of features cannot be easily identified, the legend does not appear to be complete. Some symbols can be implied, camps, dumps etc. but other symbols are a puzzle especially the rows of parallel lines in the Cape Helles area.
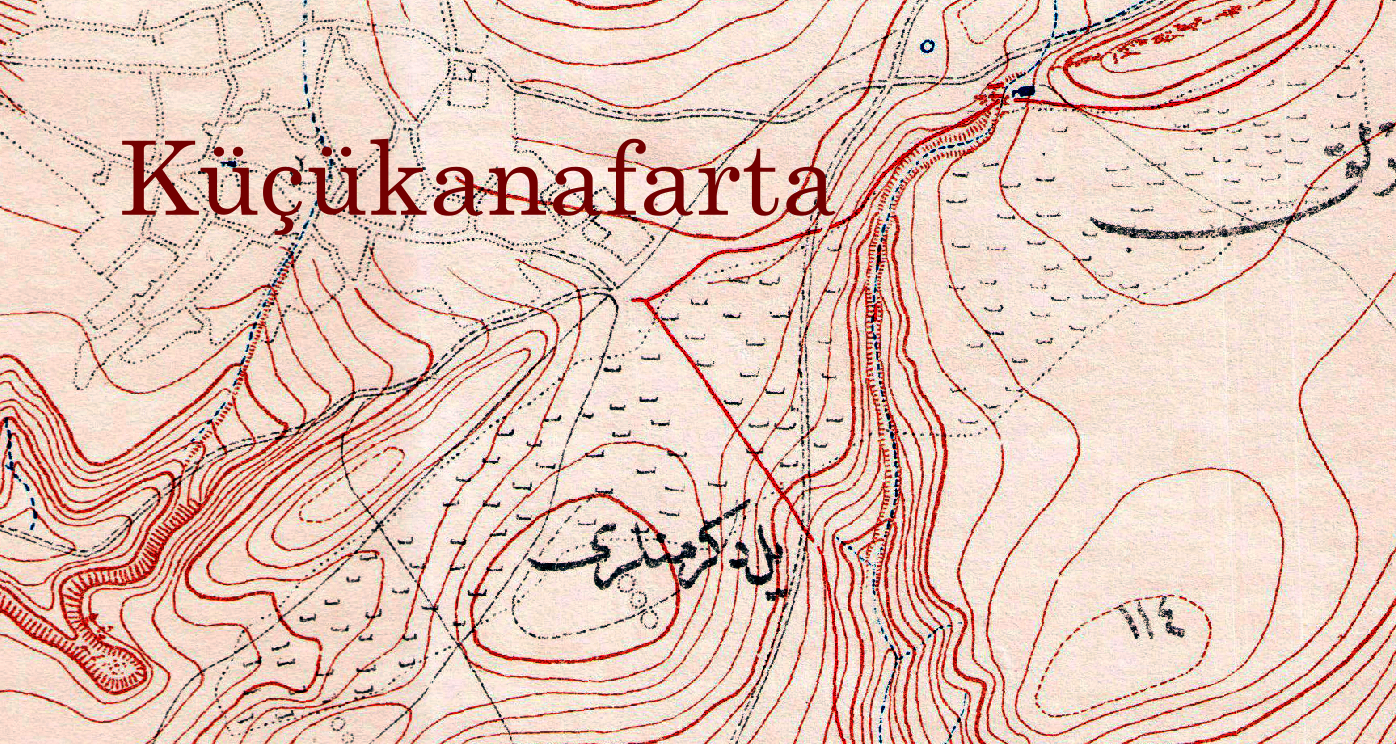
Figure 5. On the map the largest Turkish cemetery marked is south east of Küçükanafarta and measures just over 11 hectares; aerial imagery shows no sign of it but a cemetery with a similar extent is shown on 1:25,000 series maps dating from 1912-1913. Current reports, Milliyet (2016), show that a 9.5 hectare site at Küçükanafarta still has work going on, uncovering and cleaning individual graves but that does not appear to form part of the general remembrance in the same manner as CWGC cemeteries.
References
Grasping Gallipoli Terrain, Maps and Failure at the Dardanelles. Peter Chasseaud, Peter Doyle. 2015. ISBN: 9780750962261.
Milliyet (2016) ' Martyrs' cemetery found in Çanakkale', available at www.milliyet.com.tr/gundem/canakkalede-sehit-mezarligi-bulundu-2263747
Anzac Battlefield: A Gallipoli Landscape of War and Memory. Edited by Antonio Sagona, Mithat Atabay, C. J. Mackie, Ian McGibbon, Richard Reid. 2006. Cambridge University Press. ISBN 978-1-107-11174-5.
Çanakkale tâhkimât haritasi, by Şevki Paşa M, (2009), edited by Dr. Ahmet Tetik and Ayşe Seven. Published by Genelkurmay Basimevi, Ankara. ISBN 9789754095258 / 9754095256
TrenchMapper (2022). Public access via https://www.westernfrontassociation.com/trenchmapper-public/. Western Front Association members access via member's login page. To see a map ID, right click and set front to Gallipoli then right click again and set the Map ID Jump to the map id.
TrenchMapper map id md_023884. (1919) Triangulation Plan Showing Cemeteries and Graves Located in the Anzac Area. Woodley A. H., Hughes C. E.
TrenchMapper map id m_78_000263. The Dardanelles enlarged from Admiralty chart no. 2429. Undated but propably early 1915.
Knowledge Version 2 1.1