Knowledge Centre- Subject Index Main Help page |
How to find a point on a Great War trench map
This page is available as a .PDF here.
See also page on Conventional Signs.
If you have found a trench map reference like B.30.a 3.5 or X.2.a.34.12 in family or military histories, war diaries etc, this document will help find where that is.
Introduction. The trench maps used in the Great War resulted from the
exigencies of war, they were not best suited to their purpose. The map projection
used, the scale and accuracy of the surveying and quality of the drawing would
leave a lot to be desired if designed from scratch during peacetime but they
were not, they were made in the heat of battle. Seen in this light, they should
be considered a monumental achievement.
The importance of producing good maps in a very short time led to the decision to produce British maps that used the Imperial System (i.e. yards), super-imposed on the Belgian maps that used the Metric System (i.e. metres). This Belgian grid system was then extended across France. The resulting grids give rise to some confusion in modern minds more familiar with British Ordnance Survey maps but in fact the system is quite simple.
A map reference like B.30.a 3.5 is short of one extra piece of information,
its sheet number. Most Great War references were written without the sheet
reference, so one has to infer which sheet to use because that reference will
exist on all British 1:40,000 sheets. The first task is to use other information
to find which sheet it is on. On its own, B.30a 3.5 cannot tell you where
it is on the whole front, Map 1 or Map 2 below can help in that respect or
you can use this Link-> Google Earth grid to find the map sheet number.
The history or source of the reference will usually give a clue to the location,
"Near Oppy Wood", "West of Gavrelle" etc.
In the main example below, B.30.a 3.5 becomes 51b.B.30.a.3.5 , i.e. the sheet
number 51b has been added. This defines a unique point on the front.
Map reference format. Sometimes the use of dots and upper/lower case
letters can vary from the official system but that is usually easy to understand.
The reference consists of these elements but these are set out in more detail
below
In summary, 51b.B.30.a.3.5=
- 51b The 1:40,000 sheet number
- B A large square on the sheet. Should be upper case.
- 30 A smaller square within square B
- a One of four sub-squares lettered a-d. Should be lower case.
- 3 The horizontal distance from the bottom left hand corner of sub square a
- 5 The vertical distance from the bottom left hand corner of sub square
a
If 51b.B.30.a.3.5 were written as 51bB30a3.5 or even 51b.B30A35 it is still
easy to see the structure of the reference, Sheet.letter.number.letter.number.number.
Although trench maps used for Great War research are generally those drawn
at 1:10,000 or 1:20,000, the map reference is derived from the 1:40,000 sheets
so is still valid at any scale. A reference such as 51b.B.30.a.3.5 may be
written as 51b NW1.B.30.a.3.5 but the added NW1 is not required, the reference
system works for the whole sheet. For the meaning of NW1, see below.
Sheet numbering. The most active sheet numbers for the British Army
are shown on Map 1 and the full grid is shown as Map 2 below. Each numbered
sheet's mapped area is 32,000 metres wide by 20,000 metres but the British
grid is 35,000 yards by 22,000 yards. This yard based grid did not quite fit,
the misfit is more noticeable at the Western and Eastern edges. These sheets
are drawn at a scale of 1:40,000 and are numbered according to the Belgian
system, sheets 1-72 cover the whole territory of Belgium. This system was
extended Westwards into France, the new sheets having letters added, the order
being East to West, as shown on Map 1. (Later in the war, sheet 36C was renumbered
to 44A and sheet 36B to 44B.)
A given 1:40,000 sheet was subdivided into four 1:20,000 sheets or sixteen
1:10,000 sheets, however, the map reference applies to any of these smaller
sheets.
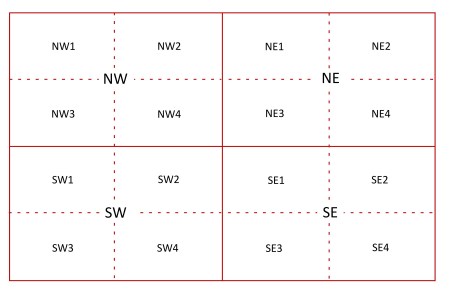
Figure 1. A 1:40,000 sheet subdivided in four 1:20,000 sheets NW, NE, SW and SE and sixteen 1:10,000 sheets, NW1, NW2 etc.
Grid system
(Early maps used a slightly different system, as shown in Appendix 1. Once
the system in Figure 2 was in use, initially maps were marked with "Revised
System of Squaring", i.e. revised from the system shown in Appendix 1.)
To provide a map reference, each 1:40,000 rectangle was divided into 24 rectangles,
lettered A to X, as shown in Figure 2. Each lettered square was then further
divided into numbered squares, some numbered 1-30 and some numbered 1-36.
A small square was referenced by letter, then by square, e.g. P.8 or B.23.
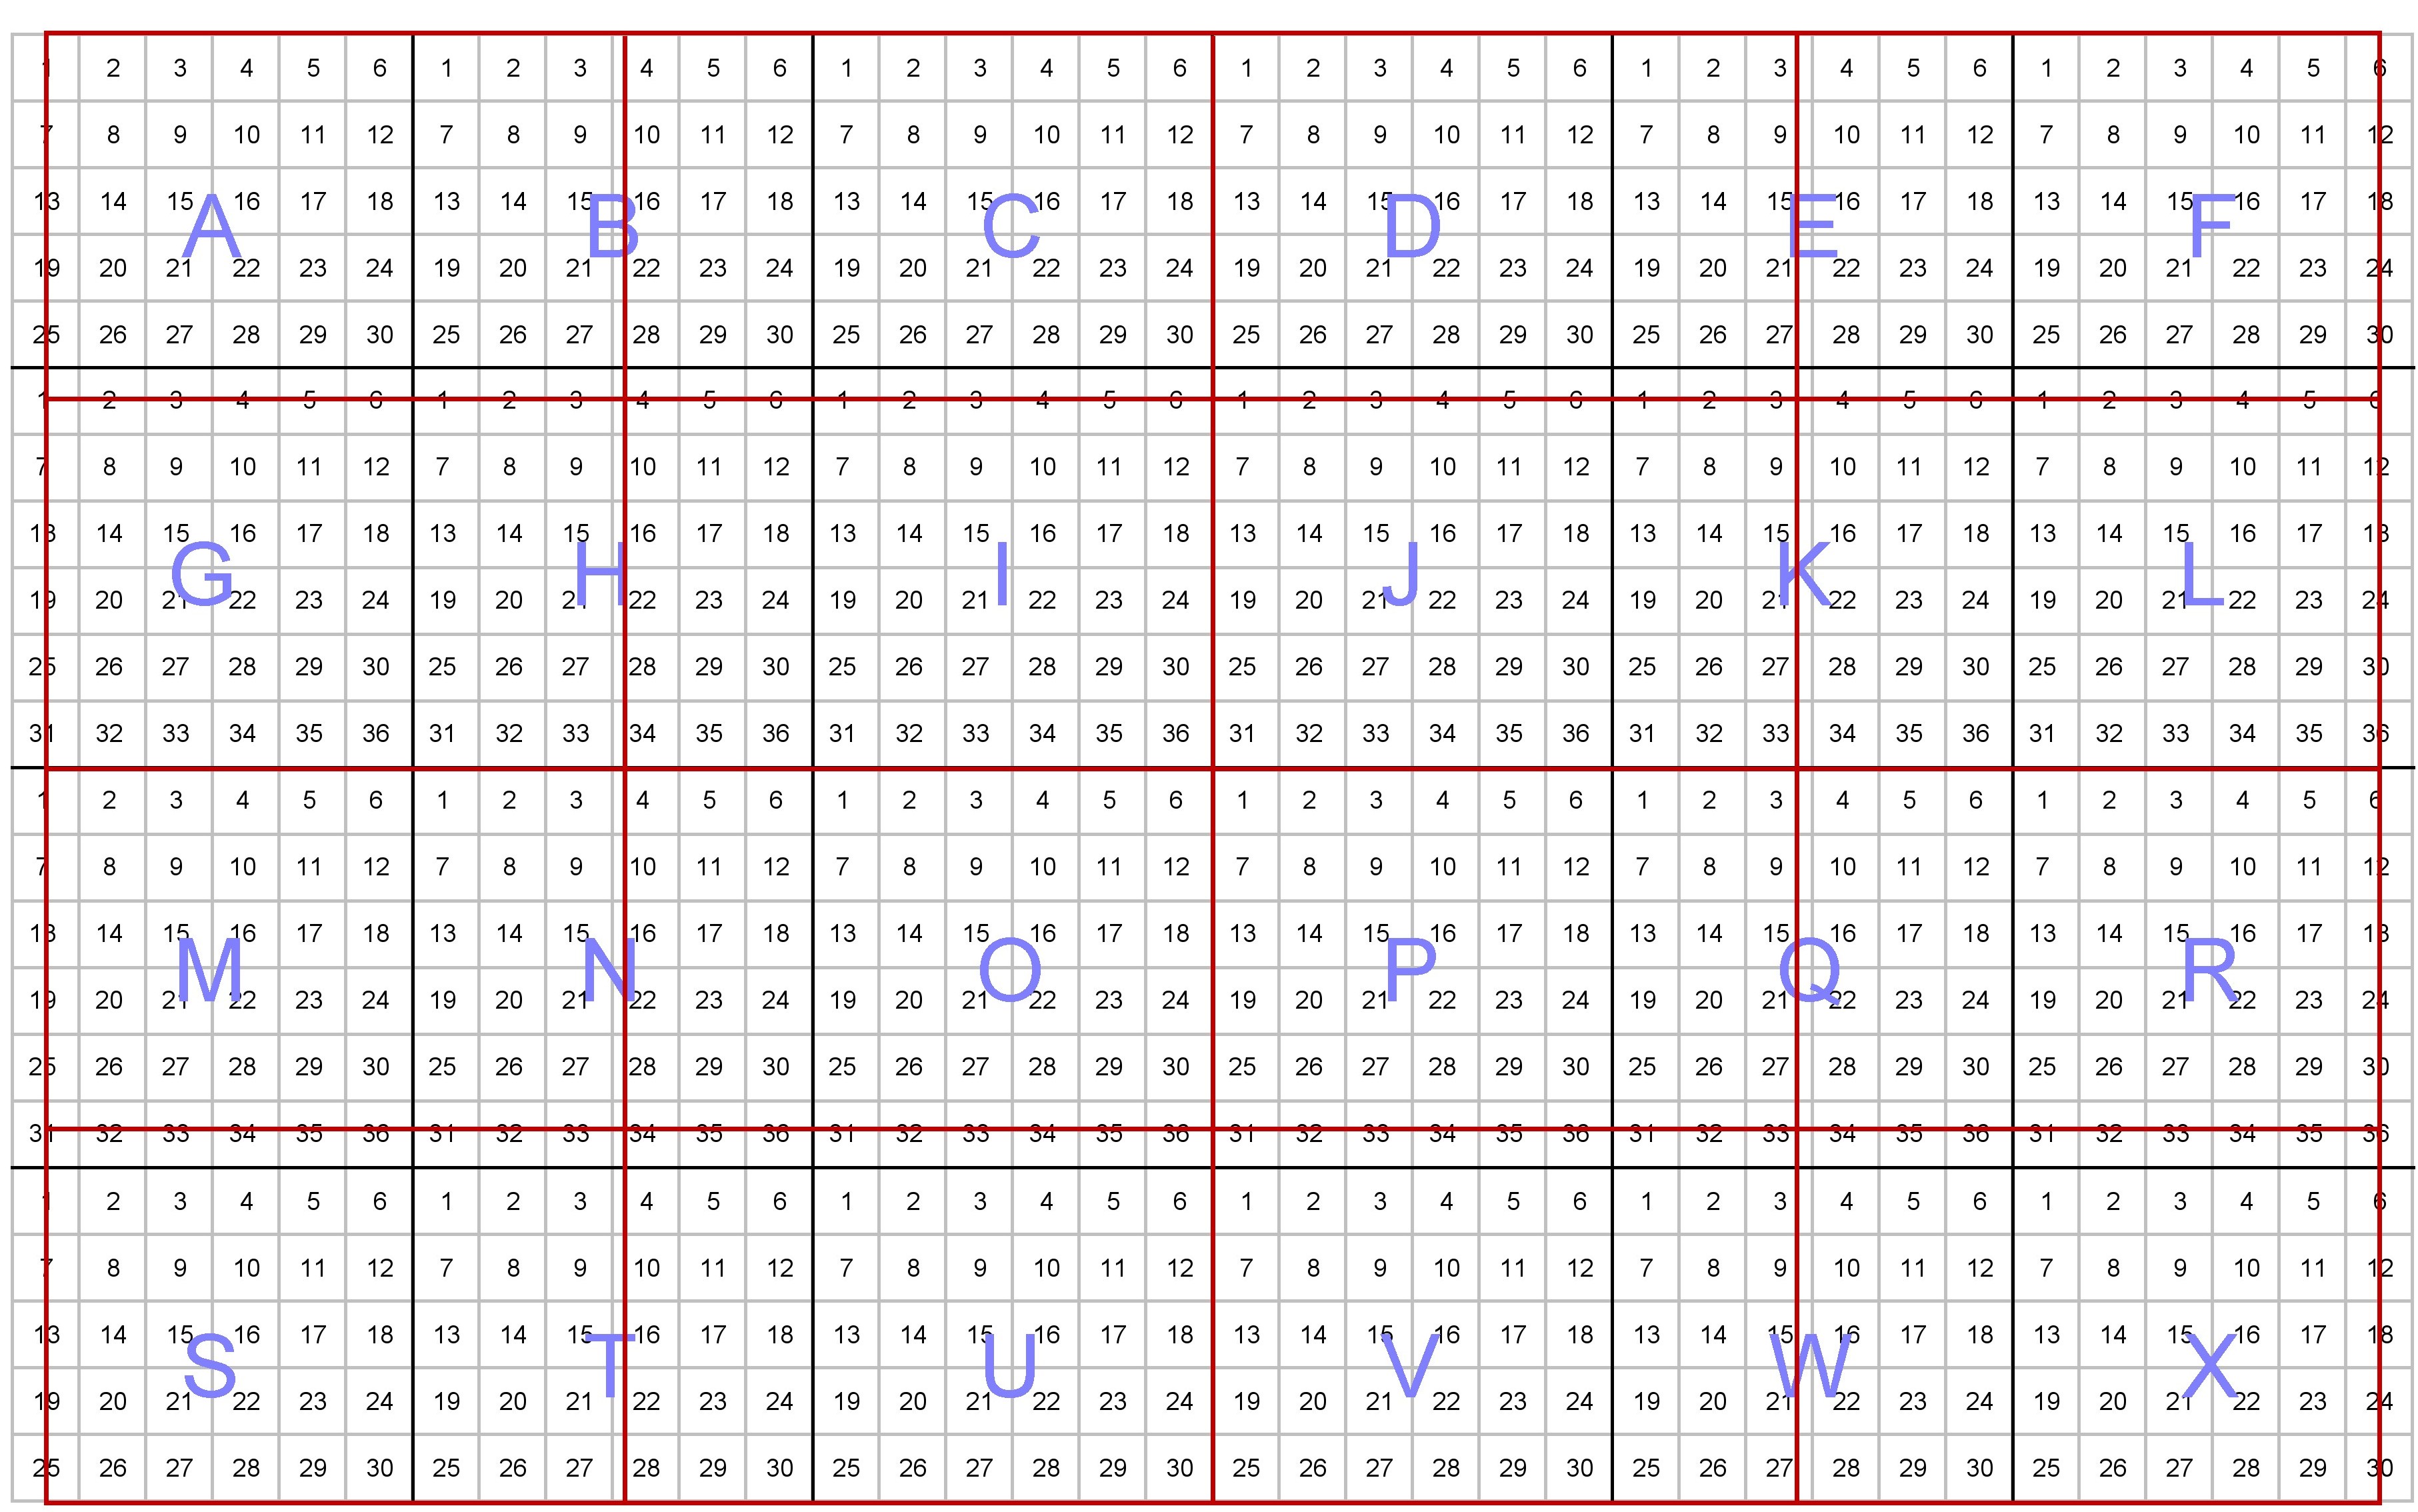
Figure 2. Main 1:40,000 sheet grid system, on some earlier maps called the "Revised System of Squaring". (See Appendix 1 for the older system). The red yard based grid does not fit the underlying metre based mapped area. The mismatch is larger at the Western and Eastern edges, less noticable North and South but still present.
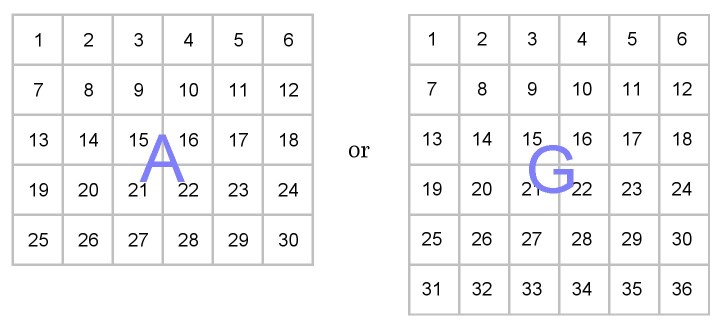
Figure 3. Each lettered square is divided into either 30 or 36 smaller squares
To define a point. On a 1:10,000 trench map, the lettering of the squares
were shown as large letters often in the corners of each square, the numbers
being presented in the centre as the sample below. Each numbered square is
1000 yards wide and was further subdivided into four 500 yard squares, lettered
a, b, c and d row by row.
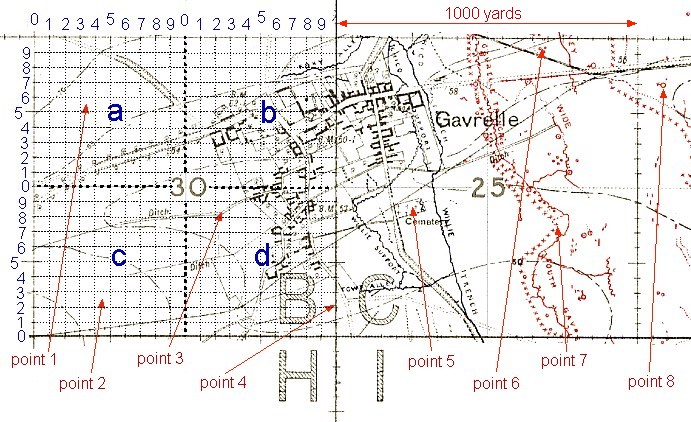
Figure 4. Section of 1:10,000 sheet 51B NW2, Oppy.
A point such as point 1 (the tip of the arrow) in figure 4 is expressed
as B.30.a.3.5, i.e.:-
- B, the main 1:40,000 square it is in,
- 30, the numbered square within B,
- a to indicate which of the four 500 yard squares
- 3 to indicate the square east-west. This is called the Easting
- 5 to indicate then the square north-south. This is called the Northing
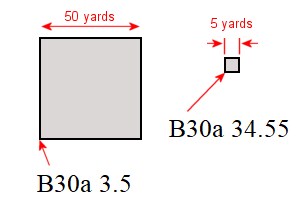
This point, B.30.a.3.5, covers an area 50 yards x 50 yards. In a strict reading of the grid system, if a soldier was recorded as being buried at that reference then the actual location could be anywhere within that 2500 square yards. In practice many used the grid reference as a point.
Sometimes references are given to the resolution of 5 yards by using 2 figures
such as 34.55 instead of 3.5, where each 50 yard square can be thought of
as being further divided into ten rows and ten columns. A point written as
34.55 would indicate 3 squares from the left plus 4/10th of the way into that
square and 5 squares to the north plus 5/10ths of the way into that.
| Point | 50 yard resolution | 5 yard resolution |
A reference gives the lower left hand point of a square, the actual position on the ground is somewhere in the square. It defines an area, not a point but many reports use a map reference as a point, e.g. for an artillery battery. |
|
| 1 | B30a 3.5 | B30a 34.55 | ||
| 2 | B30c 4.2 | B30c 45.25 | ||
| 3 | B30d 2.8 | B30d 24.83 | ||
| 4 (on the vertical line) | C25c 0.2 | C25c 00.21 | ||
| 5 | C25c 5.8 | C25c 51.84 | ||
| 6 | C25b 3.9 | C25b 36.92 | ||
| 7 | C25d 4.7 | C25d 48.73 | ||
| 8 | C26a 1.6 | C26a 17.67 |
Figures 4 & 5 show a dotted grid to demonstrate the idea of the squares,
real trench maps do not have these dotted lines. Perhaps the easiest way to
get a precise measurement is to make a scale such as the one shown below positioned
over square 30. It is made from card with the scale carefully marked off from
the side of a grid square. In the example here, the card (often called a Romer)
is positioned to measure point 3, the tip of the arrow is placed in the corner
of the cut-out card. The distance from the left (the Easting) is taken from
where the vertical line crosses the scale, similarly, the distance up (the
Northing) is taken from the horizontal scale.
The more accurate values for references in the form B.30.d.24.83 can be estimated,
in this case 2.4 and 8.3 squares.
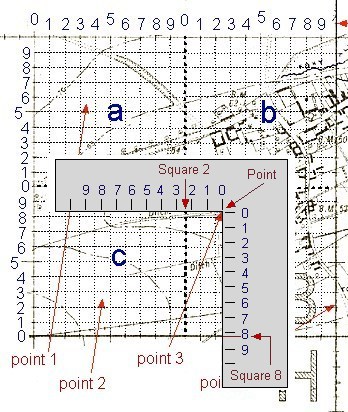
Figure 5. Using a Romer to measure position
Examples
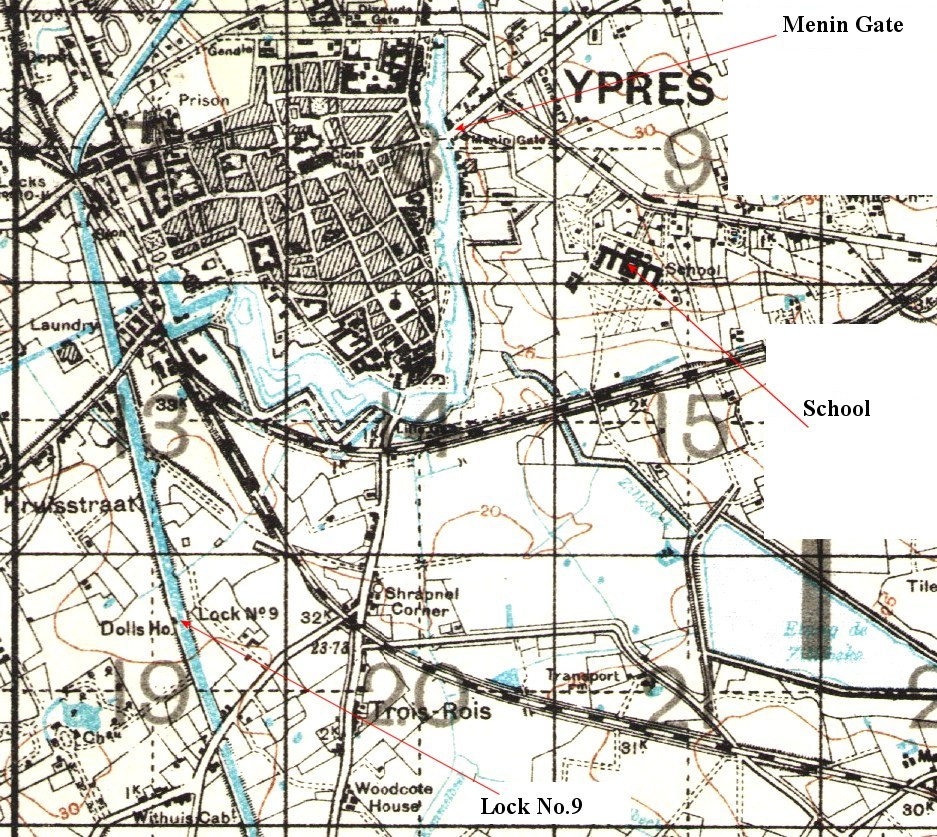
Example 1 from a 1:40,000 sheet.
The centre of the Menin Gate on the Eastern side of Ypres is at I.8.b.3.2. This is from sheet 28 so the full reference would be 28.I.8.b.3.2.
The centre of the school is at 28.I.9.c.6.2
Lock No.9 is at 28.I.19.b.2.5.
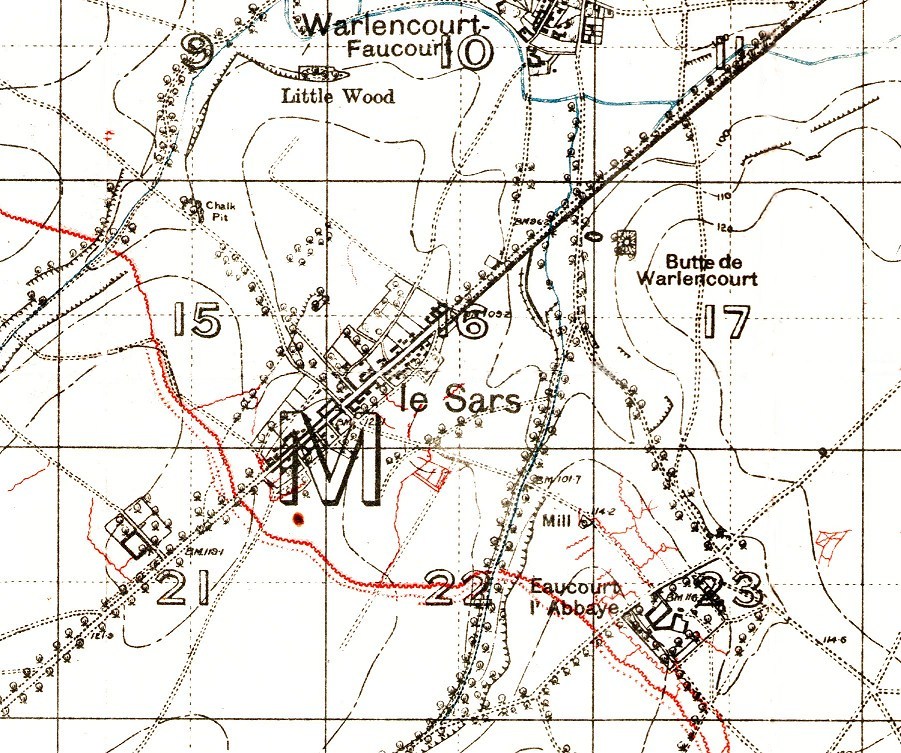
Example 2 from a 1:20,000 sheet, 57C SW
The Mill SE of Le Sars is at 57C.M.22.b.9.5 (The SW in 57C SW is not used). More accurately, it is at 57C.M.22.b.94.46.
The Chalk Pit NW of Le Sars is at 57C.M.15.b.0.8
The centre of Le Sars is at 57C.M.16.c, there is no use here quoting the
distance within square M16c.
Examples 3 from a 1:10,000 sheet, 36C NW1
Loos Church is at 36C.G.35.b.7.4 or more accurately, 36C.G.35.b.65.38. This is an early map and shows the squares a-c . The NW1 is not used.
Loos cemetery extends from about 36C.G.35.a.7.1 to G.35.c.8.9.
Tower Bridge (shown as a rectangle with diagonals) is at 36C.G.36.a.3.0 or
more accurately, 36C.G.36.a.33.02
Map 1, part of the grid system as used in the Great War.
Click for larger version
Map 2, the full Great War grid numbering, based on Belgian sheet numbers
and extended across France and Holland. The existence of a numbered square
does not imply that a map was actually drawn for that square, the system was
planned before the extent of the trench lines was established.
Click for larger version
More information
A fascinating description of various aspects of trench maps can be found in the "Topography of Armageddon" by Peter Chasseaud.
ISBN-10: 0951208012
ISBN-13: 978-0951208014
For a comprehensive history of the mapping of the Western Front, see Peter Chasseaud's book "Artillery's Astrologers: A History of British Survey and Mapping on the Western Front, 1914-18".
ISBN-10: 0951208020
ISBN-13: 978-0951208021
There is a downloadable KMZ Great
War grid available here that can be loaded into Google Earth.
Appendix 1

Older system of squaring
The map is divided into large squares, lettered "A", "B",
"C", "D", etc., the sides of which are 5,000 yards in
length.
The large squares are divided into 25 smaller squares, numbered 1 to 25, the
sides of which are 1,000 in length.
The areas 6, 7, 8, 9, 10, in squares CC, DD, EE, FF, GG, HH, JJ, are rectangles
of 1,000 yards by 830 yards.
The minor squares and rectangles are to be considered as lettered "a",
"b", "c", "d," but the letters are only printed
in one small square to avoid confusing the map.
A point can thus be described as lying in square A.2.c, D.5.a, etc.
If the position of a point can be identified more closely, the further description
N, S, E, or W may be added.
If only the description of the small squares is given, e.g., A.2, the position
indicated will be taken to be the centre of A.2. Similarly, A.2.d. will be
taken as meaning the centre of the minor square A.2.d. unless a further description
N., S., etc., is added.
The description A.2.c.d. can be used if uncertainty exists as to whether "c"
or "d" is the correct minor square.
Most maps of the Great War did not use this early system. When it was superseded,
for a while maps were marked "Revised System of Squaring".
Knowledge Version 2 1.1